Monday, 28 December 2015

Electrics being installed

Week Twenty.

Daniel is going to install my electrics for me and then get them signed off by a registered electrician.  I had a good idea of what I wanted and where, but it was good to actually get into the building with Dan and imagine the layout of the furniture so that electrical sockets will be in the correct place. 

The mezzanine level will have a double socket with USB ports near where the children will sit - to power a table lamp plus tablets and computers.  There will be another double socket on the opposite wall where the TV and games console will be.  We have also put in a fixed socket where the 1000w electric panel heater will sit.

The utility room will have power supply for the tumble dryer and freezer (both hidden under counter) plus a double socket at worktop level .  We also have three switches next to the door for the outdoor light, main angled spotlights and the LED strip light controller.

View of the gable end mezzanine. Timbers in the wall and sockets ready to place glass panel heater.
Three switches controlling outside light, LED spotlights and LED strips
Sockets on the wall in the utility area - where the kitchen units will be sited

Zinc roof agreed at last!

Week Twenty.

After lots more research into finding a zinc roof installer, I sent off another load of e-mails to various companies asking for a quotation.  Justin found a Southampton based company via the internet called Elite Lead and they came out to see us last Friday. They were very straightforward and did not seem at all bothered by the slightly complicated rear gutter arrangement which has put others off.  As they quite rightly said, their zinc roof will simply run into gutters all the way round.  They said that they would ring me later on Friday hopefully with a quote.

Having heard nothing all week, I was itching to ring this morning.  I was worried that the lack of contact meant they had had second thoughts.  I thought I would leave it until lunchtime, but on the way to Fordingbridge to the dentist, my phone rang on handsfree and it was them!  The quote is far more reasonable and actually bang on what we felt it should be.  We were basing our estimate on the price of approx £100 per square metre plus VAT.  Our roof is approximately 33 square metres. I was so pleased! 

I talked to Dale at Elite and we discussed the option of squeezing the work in between Christmas and New Year as they had an available window; however when talking to Dan and looking at the pretty awful weather forecast, we felt that it would be far more sensible to wait until the New Year and find a better weather window.  Dan estimates that he has about three days worth of work in order to get the roof ready for the zinc and he needs to work in dry weather.  In doing our research, we have found that it is imperative that the timber layers in the roof construction are bone dry as any condensation is very bad news.


Image from Elite Lead website

Mechanism for sliding storage


Under the mezzanine, I plan to have lots of storage hidden behind doors.  My idea is to have a large space with shelving where we can easily access things, plus simply push the lawnmower in.  I then would like pull out storage in the form of massive sliding drawers which will contain boxes stacked up.  This means that even the boxes at the rear can be easily accessed making it much easier to get hold of items.  My dream would be to have perfectly labelled boxes so I can find everything when needed rather than having to rummage through lots of different boxes!

I have found a really strong sliding drawer mechanism called the Titan D which can be supplied in a wide variety of lengths and can carry a substantial weight.  The ones I am looking at are 1200mm long and a pair of these can carry up to 95kg.  I plan to put a false front on the drawer, so when pushed back inside its housing, it will look like wall panelling and be virtually invisible.

Wednesday, 23 December 2015

Temporary roof in place for the Christmas break

Week Twenty.
 
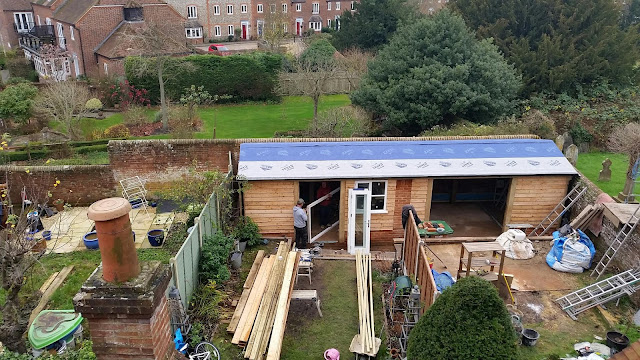
Luckily the last day before the Christmas break was dry and sunny.  Dan and Jack fixed a brand new heavy duty plastic sheet onto the roof and securely battened it down.  We all feel much happier that the building is as waterproof as it can be until the zinc roof goes on.  We shouldn't have any more water leaking onto the internal rafters, so they can now properly dry out and be ready for sanding when work resumes in the New Year. 
 
The roof just prior to plastic sheeting going on

Tuesday, 22 December 2015

Week Twenty - gable end windows

Week Twenty.

We have decided to get some triangular shaped windows put into the oak timbers at the gable end of our building.  We feel that it will be an important source of natural light and it would be a shame to cover it over in larch cladding.  Dan gave me the measurements required and I made two strong cardboard templates.  I ordered the double glazed units from Salisbury Glass - one pane in a satin opaque and the other plain glass as it will give a view into next doors garden so we felt it needed to be obscure glass. 

I went to collect them today only to be found that they had been cut according to the length and height measurements given - so rectangular not triangular!  It was clear on the order form that they needed to be cut according to the templates supplied, so it is not my problem but it was very annoying to find that I had made a wasted journey and they will now not be ready until well into the New Year....


View of gable end which will be glazed

Roof window decisions


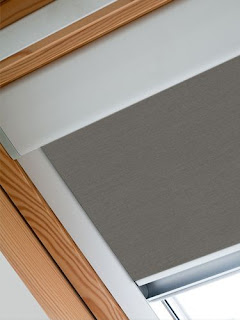
We have been giving the roof windows a lot of thought and have decided that two 78x98cm Rooflite Nito windows.  They are made by a sister company of Velux and are very well rated.  They are also quite a lot cheaper!  I was able to take advantage of a Black Friday deal and get two for £50 each plus VAT (new but customer returns) and two for Laura.  We are sharing the benefit of the deal price, so it means that we paid £211.98 each for two windows.  All four are going to be installed along the rear of the roof out of sight of the house - we didn't want the lines of the zinc roof being interrupted by the windows along the front, plus it is at the back where we need the natural light flooding in as we have plenty of light from the front.
Rooflite Nito
I am probably going to go for some grey or pale grey blackout blinds too, but there is no rush to order those yet.
 

Larch cladding complete and door goes in

Week Nineteen.

We now have a relatively secure building (apart from the fact that the roof is just a felt layer) as the rest of the larch cladding has gone on and the door and window are now installed. 

We will be painting the door and window in a dark/mid grey so they will look a lot better than they do in white.  We are really pleased with the quality of both door and window.  The door is an Arden Stratford hardwood door which we bought from ebay for £156 (plus a bit in delivery charges).  The door was second hand but was in excellent condition.  Dan and Jack have managed to make use of the frame which came with it - there is a little bit of damage which will need filling but as we are painting them, it is not a problem.  The only thing we are missing is the strike plate which would have been at the bottom on the door threshold - the metal plate for the bolts to lock into.  Dan has found me one on ebay for £3.20 with free delivery, so that is on order - bargain!  The window was a brand new double glazed casement window with one opening side.  It looks really good in situ - I had been worried that it was going to be a bit on the large side, but it fits perfectly. 

View from the bathroom - door frame going in
Door and window in situ

Monday, 21 December 2015

Week Nineteen - internal work starts

Work has started on framing out the internal walls in preparation for insulation and plasterboard. Until the roof goes on Dan is not going to put any insulation in - it is just the framing until we are properly watertight.

We now have a mezzanine floor too which appeared really quickly and looks great. Dan has sourced some 150 year old oak floorboards which have been planed and cut into a tongue and groove style.  These have gone on top of the framework and Jack has now sanded them.  They match the horizontal oak beam very well and I just need to think about what to coat them with.  I am thinking of a wax finish.

Exploring other roofing options

Week Eighteen

We are currently exploring other options regarding the final roof covering.  With the zinc quote coming in at over £5,000 we are looking at aluminium and steel alternatives plus slate.

We have looked at Vieozinc (aluminium base with a real zinc layer on top) but the first quote for this has come in at £7,790 plus VAT!  When asking why this was much higher than expected, I was told that although the material costs for Vieozinc are cheaper than real zinc, due to the small area to be covered this does not reduce the costs much, plus the labour costs and flashings etc are the same as for zinc, so the overall price is not much cheaper.  This quote was much more, so their labour costs etc must be a lot higher. 

Vieozinc

It does look like zinc though but we are not paying more for this product when it is not the real thing!


We have also found a Swedish steel product called Prelaq Nova Plx which is a heavily galvanised steel coated in zinc.  We have made some enquiries about this product but again quotes have come in at higher than real zinc.  Very frustrating....

Prelaq Nova Plx
 
 
The above image though is exactly the look I want to achieve and has confirmed my feelings that we need to go back to real zinc in the Anthra-zinc shade and get some more quotes....

Thursday, 10 December 2015

Roofing felt, larch cladding and window

Week Eighteen.
 
Lots going on at the moment.  Dan and Jack have covered the roof in a layer of breathable but waterproof roofing membrane. It will be one of the layers in the roof build up but ideally needs covered soon as it is not designed to be left alone.
 
Work has also steamed ahead with the larch cladding which seemed to happen really quickly.  Our window which we bought months ago has also gone in and we are really pleased with the proportions.
 
 
Roofing felt goes on and larch cladding begins


Guttering line detail
Our window goes in
Window and larch cladding

Wednesday, 9 December 2015

Week Eighteen - capstones removed and lead flashing put in

Week Eighteen.

Following the recommendations from Graham the zinc roofer, Dan has re-thought the guttering at the rear and came to the conclusion that he needed to take the capstones back off and put a full lead flashing through the wall instead of a layer of damp proof course.  This will eliminate any worry that rain or roof run off
The capstones of the wall went back on today - on top of a full width lead flashing. The finished roof will sit above the gully and will have a standard plastic guttering catching most of the rain from the roof.  The lead will just be a back up to stop any moisture on the capstones getting down into the wall.


Tuesday, 8 December 2015

Visit from zinc roofing company

Week Seventeen.

We have had a visit from a zinc roofing specialist who came to see the roof in order to provide a quotation.  I had been liaising with Graham - the owner of the company for quite a long time - even before the project started and he said that in order to give us an accurate quote, he would come and see the project as soon as the main timbers were in place.

To cut it short, Graham was concerned about a number of issues with the rear part of the roof, especially the construction of the frame and roof in relation to the brick wall at the rear.  He said that as zinc sheds water faster than other types of roofing materials, any heavy rain would shoot off the roof and constantly soak the capstones of the wall and therefore make the wall wet and potentially cause water to come into the building at this point.  He was also concerned about our lack of scaffolding around the building.  His quotation came in at just under £5,300 which is more than we were expecting (we had been expecting a quote in the region of £4,000 for both sheds) so we are currently looking at other options and other zinc roofing companies.
 
 
Dan and Graham discuss the rear guttering issues...

Wednesday, 2 December 2015

Dwarf walls put up

Week Seventeen.
 
The dwarf brick walls have gone up but we have made the decision not to put them on the back wall inside the building. They were going to be used to hide the damaged lower courses of the old wall, but we felt that they would have stuck out too much into the room, plus the colour of the reclaimed bricks is much pinker and more orange than the existing wall which is actually quite red lower down. We felt the colour contrast would be too great and have instead chosen to have the lower part of the wall battened and insulated like a mini stud wall with the oak shelf on top and a matching oak skirting board below. We can then simply plaster the gap between and paint it the same as the other walls.
 
Dwarf walls go up

Tuesday, 1 December 2015

Week Seventeen - work on roof

Week Seventeen.
 
Today, work was done on filling in the gap between the rafters so a set of oak lengths were cut to size and inserted between the rafters.
 
Oak timber inserts between rafters
View along length of shed
Close up of oak inserts in roof

Thursday, 26 November 2015

Frame completed and rafters go up

Week Sixteen.
 
A good week weather wise considering that it is late November. The frame was finished and the rafters have also gone up.  We had a few decisions to make including the exact height of the mezzanine level - which we set at 4' - and the positioning of the two vertical oak beams set either side of where the door is going to be. We wanted the door to be fairly central giving the mezzanine level enough space but also leaving enough space for the window over on the right hand side.

The rafters have gone up too so we have had the first chance to see how high the mezzanine level will be.  I have to stoop but it gives a reasonable height for the kids plus leaves enough for a decent amount of storage underneath.
First view of the roof
View from the side - starting to feel like a proper building!
View from inside
Horizontal beam set at 4 feet high - the mezzanine will sit at this height with storage below
View from the garden
View of Laura's shed from our garden.

Monday, 23 November 2015

Week Sixteen - frame goes up

Week Sixteen.
 
Dan worked all weekend making the most of a good spell of dry weather and managed to get the majority of the box frame up.  Work has continued today with the box frame being completed and some of the six king posts being put in position.  Standing down on the scalpings today directly in front of the buildings gave me the first sense of how big they are actually going to feel. Up until now, the floor space felt small and there was no way of imagining what the front of the building was going to look like.
 
Huge progress after a lot of hard work plus weekend working!
The middle vertical post marking the position of the mezzanine/storage section (to the left) and the main utility part (on the right).
The two front vertical posts marking where our doors will be.
Brick pier and oak frame meeting
View from the garden

Thursday, 19 November 2015

The first oak beams go up

Week Fifteen.
 
Despite almost constant drizzle today, Dan and Jack managed to get the first timbers up. They erected a temporary shelter to keep off the worst of the weather. They are having to position the rear left hand post away from the wall to get over the fact that the wall not only leans out towards the top but it also bows out at the centre so without this adjustment, the buildings won't be square.
Trying to keep dry...
Trying to overcome the lean in the brick wall
First horizontal oak beam in place