Monday, 28 September 2015

Working on the wall

Week Seven
 
I was able to spend a bit of time today removing some of the loose bricks from the wall so that they can be mortared back in tomorrow. I was only able to take out a few as the wall is only two bricks thick so I didn't want to de-stabilise it.
 
Note the poor state of many of the bricks
Bricks removed prior to restoration work

Week Seven - bricks cleaned

Week Seven.
 
Today, we had a chap called Phil arrive to clean the 1,100 bricks we had bought from the Church Hall development project less than 100m from our houses. Phil had been working on the Church Hall development and had finished there, so was able to come to us.  He had a lovely day weather wise and even had the shade of a tree to work under!  The bricks cost us £750 and Phil charges 10p a brick to clean them. It took him from 9.30am until 4.30pm which is pretty good going! They are all now clean, stacked and ready to move into our gardens.
 
Phil cleaning up the bricks
A small hand axe and a good eye required
Still lots to do!

Sunday, 27 September 2015

Oak timber for frame has arrived

Week Six.

On Friday, the green oak timber and larch cladding arrived. A couple of weeks earlier than Dan needed, but it was ordered from a company in the North and they wanted to deliver. It has been put in our garden and we will keep it covered overnight. The weather forecast for next week looks good again so we have been really lucky.
 
Oak timber for frame in the garden

Deck lights installed

Week Six.
 
I am thrilled to bits with the square decking lights. We ended up buying a second pack of eight which we will split with our neighbour, so that we each have twelve each.  We are having three put into the top of the retaining wall and nine put into the faces of the steps. They look amazing!
 
 
We will have a total of twelve deck lights - nine in the steps and three in the retaining wall
View of the three deck lights in the retaining wall

Railway sleeper steps

Week Six.
 
Dan and Jack have worked on installing the railway sleeper steps this week. We have had excellent weather so long may it continue!  We are having three long steps which will be formed from sleepers up on their short edge and are putting in decking lights.
 
View of bottom two steps plus deck lights installed in steps and side wall

Week Six - work on railway sleepers

Week Six.

I have been busy this week giving the green oak railway sleepers two coats of clear wood preserver then another two coats of Decking Oil. We chose Barrettine Decking Oil in Dark Oak. It goes on beautifully and once dry gives a lovely matt finish revealing the wood grain underneath.
 
Starting to stain the sleepers with Barrettine Decking Oil
The decking oil goes on really easily and is a pleasure to use
Just one coat makes all the difference but second coat applied to give greater protection
Barrattine Decking Oil in Dark Oak

Friday, 18 September 2015

Railway sleepers have arrived

Week Five.

The railway sleepers arrived yesterday. We have chosen new oak sleepers and our neighbour went for the traditional reclaimed style. We bought Everbuild Wood Preserver in clear and I got to work almost straight away in giving them at least two coats. It was a lovely job to do - just sloshing the liquid on very generously allowing it to soak in.
The oak sleepers placed in the garden
Everbuild Wood Preserver - clear
Work starting on putting the wood preserve on the oak sleepers

Tuesday, 15 September 2015

The builders ramp

Week Five.

This is the ramp that has been cleverly constructed in the churchyard (with permission from the church). This gives good access into our gardens and means that a wheelbarrow can be used to ferry materials to and fro.

Week Five - bricks bought

Week Five.
 
We have been very lucky in sourcing bricks for the dwarf wall and garden wall.  A development project literally 100m away from us (an old school which was then turned into the church hall) had stacks of bricks surplus to requirements do I was able to negotiate with the developer and buy 1100 which is more than enough for our purposes. I am thrilled to bits as they are beautiful bricks and a perfect match to our houses. They are also from a local historic building and it is great to keep them in the village. They are currently under a tarpaulin in the churchyard (having obtained the Church Wardens permission) as the builders are not back with us until today. The weather doesn't look great so they may hold off until tomorrow.
 
Bricks safely stored in Churchyard. Note end of access ramp just visible in the distance
1100 beautiful bricks

Wall prep finished

Week Four.
 
I have now done as much as I can on preparing the wall. It still needs some attention using either jet washer or sand blaster to remove the old grey limewash but Iapart from concentrating on the odd brick, I think another method has to be better.
 
View of the gardens from the access platform

Friday, 11 September 2015

More work on wall - no builders on site

Week Four

No builders on site this week as they were allowing time for the concrete footings to set.  Weather wise, it has been fantastic. I have nearly finished removing the mortar from the bricks and did a bit more cleaning of them,  but I am going to leave the worst bits for the pressure washer or sand blaster as it is a painfully slow process.
 
View of brick wall from the garden
Brick wall after quite a lot of work. Starting to look better but a long way to go!
The concrete footings being left to set
View of shed area from bathroom
Close up of wall ready for re-pointing

Sunday, 6 September 2015

Working on the wall

Week Three.
 
I have been working on the wall this weekend.  Parts of the paint covering come away quite easily,  but some of the grey areas are a rock solid limewash.  I have to literally chip away with a paint scraper trying my best not to damage the surface of the brick underneath. It is slow progress,  but I can really see a difference in the two images.
 
Before...
After...

Saturday, 5 September 2015

Digging complete!

Week Three.
 
The guys have worked so hard this week - they reckon around 50 tonnes of soil have been removed in total!
 
Trenches were dug for drainage pipes and they were then back filled with shingle.  The foundation trenches were then dug and filled with concrete.
 
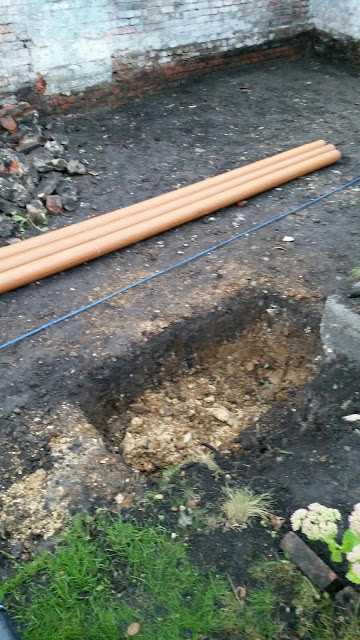
Pipes ready to go into the ground to feed rainwater from roof into soakaway
Gravel lines mark the location of pipes buried in the ground which will take rainwater from the roof
Freshly poured concrete foundations and now covered over soakaway (gravel area bottom centre)

Wednesday, 2 September 2015

Footings and soakaway preparations

Week Three.
 
Work was completed on digging out all the soil to the necessary depth today. Now work is starting in digging down to create a soakaway - I hadn't realised that this involved digging an area down another five feet in order to put plastic honeycomb cages in. The lovely dark soil was finished and they were down to a chalk and clay mix - not great.
 
The black plastic crates are for the soakaway which will be a further five feet down into the ground
The hole starting for the soakaway - note the change in soil type - much harder to dig!

Tuesday, 1 September 2015

Week Three - still digging...

Week Three.
 
After a rainy Bank Holiday Monday it was back to work today and the digging out continues. The weather was perfect so now only a small amount of soil remains to be taken away. Lots of old bottles were found in a rubbish dump area - most with a Salisbury manufacturer marked on the glass - it will be interesting to find a date for when that company was in business.
 
I used some brick and patio acid after work had finished for the day on my brick wall to see if it would remove some of the coal dust and limewash, but although it helped remove the limewash it took a lot of effort and didn't touch the coal dust staining.  It was Jewsons brand so I will check the strength of acid and may have to use a stronger one.
 
View from the bathroom - you can see the amount of grey limewash on the brick wall - it is going to take a lot of work!